Last year, I shared a Star Trek hot/cold pack that I was commissioned to make. I had so much fun working closely with my customer to make a product that fit his needs exactly. I have recently had the opportunity to do more commissioned projects that I would love to show off.
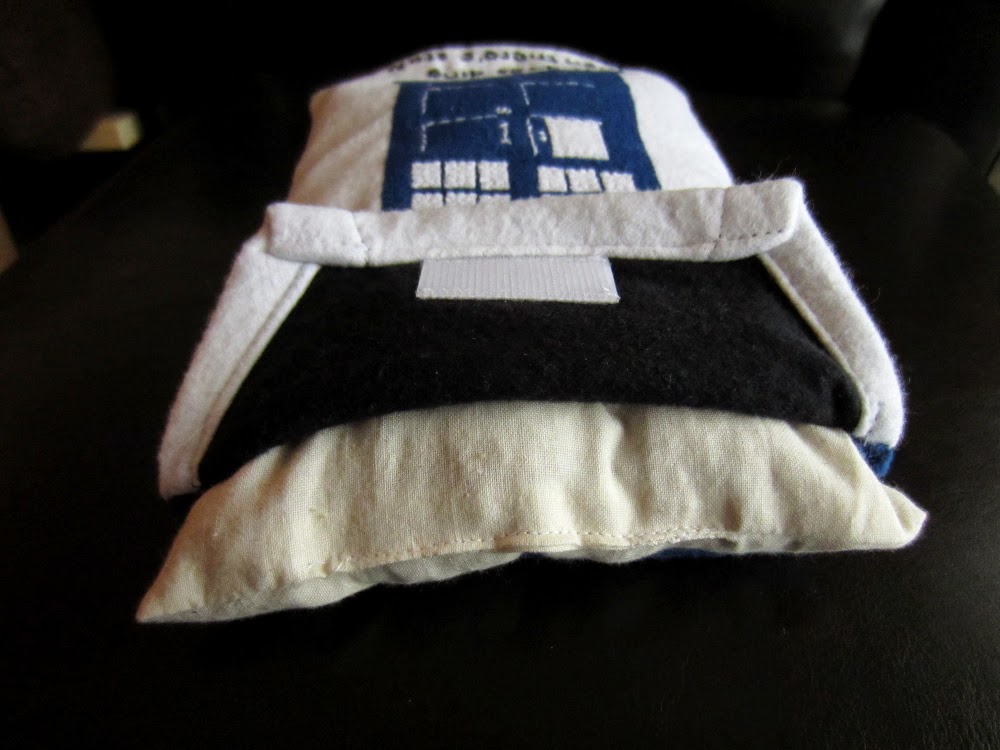
The first was for another Etsy customer who wanted the perfect Christmas gift for an avid Doctor Who fan. Through the course of conversation, I discovered that the recipient of this hot/cold pack and I both favor the 10th Doctor. (Who doesn't, right?) So, we collaborated on a quote to include in the design: "This is my Timey-Wimey detector. It goes ding when there's stuff." Classic David Tennant.
On a side note, this customer was pure joy to work with. It felt so good to make something that was met with so much appreciation. It is incredibly uplifting to be able to do something I love and have the finished product be so well-received. That experience reminded me why I started this business to begin with. As a result, I've been re-thinking my business strategy. I would love to do more custom, made-to-order items, as they have been the most rewarding part of having an Etsy shop. Long story short, I will be re-vamping my shop this year to feature more one-of-a-kind products. I'll be phasing out some of the products I've made in bulk. That means I need to purge some inventory; so if you've had your eye on any of the ready-to-ship items, get ready for some huge sales!
This second hot/cold pack was more of a personal project. I made it as a gift for one of my own close friends. When we were in high school, we would frequently crochet together.
Although she now lives on the opposite side of the country, I still like
to think of us as craft buddies. We are both sci-fi geeks, always have been and always will be. More specifically, we both watched and loved all things Stargate when we were in high school. There will always be a special place in my heart for SG-1, partly because of the memories I have of the two of us watching and talking about the show together. Because we share such a fondness for Stargate, I thought it would be appropriate to make her a Teal'c inspired gift.
Happy anniversary, dear friend, and congratulations on the birth of your beautiful daughter!
Showing posts with label Cricket in the Ear Products and News. Show all posts
Tuesday, March 3, 2015
Monday, August 11, 2014
United Federation of Planets Custom Project
My favorite thing about buying and selling on Etsy is the collaborative mindset of the community. You can customize just about anything, and most people are very open with ideas for improvement (or expansion) on existing product listings. My husband custom-ordered my wedding ring from an Etsy seller before we even knew much about the community. I've not been selling very long, but I've gotten many requests for customization of items I've listed. Requests are usually for a different size or more color options. Thanks to the collaborative efforts of my customers, I've been able to fine-tune some of my more successful products to meet a wider range of needs and tastes.
My favorite request so far came in a few weeks ago. I was asked if I could make a hot/cold pack with the United Federation of Planets emblem on it. As a Trekkie, of course, I jumped at the chance! How could I turn down a project like this?
I won't go into too much detail about the process. Suffice it to say I approached the stars through a good deal of trial and error. The smaller stars were fairly easy, though I had to teach myself the French Knot.
I didn't get the scale perfect, but considering the number of stars I stitched, I'm pleased with the outcome.
After trying to machine-appliqué the three larger stars, I was not happy with the results. They were too small to accurately follow the edge with a zig-zag stitch. So I tried to embroider them instead, to match the other stars. My under-whelming embroidery skills resulted in too much bulk, not true to the original design at all. I ended up cutting new appliqué pieces and hand-stitching them in place.
Finally satisfied, I stitched everything to the background, covered the mess on the back with a lining, and admired my own work before shipping it off to its owner.
I think I will do another for myself, only bigger and on a pillow so I can dream about space exploration.
My favorite request so far came in a few weeks ago. I was asked if I could make a hot/cold pack with the United Federation of Planets emblem on it. As a Trekkie, of course, I jumped at the chance! How could I turn down a project like this?
| My inner Starfleet cadet is trembling. |
I won't go into too much detail about the process. Suffice it to say I approached the stars through a good deal of trial and error. The smaller stars were fairly easy, though I had to teach myself the French Knot.
| Insert needle. |
| Wrap thread around needle. |
| Re-insert needle and (here's the tricky part) pull it tight. |
I didn't get the scale perfect, but considering the number of stars I stitched, I'm pleased with the outcome.
After trying to machine-appliqué the three larger stars, I was not happy with the results. They were too small to accurately follow the edge with a zig-zag stitch. So I tried to embroider them instead, to match the other stars. My under-whelming embroidery skills resulted in too much bulk, not true to the original design at all. I ended up cutting new appliqué pieces and hand-stitching them in place.
Finally satisfied, I stitched everything to the background, covered the mess on the back with a lining, and admired my own work before shipping it off to its owner.
| Here is the back, with the rice insert inside. |
I think I will do another for myself, only bigger and on a pillow so I can dream about space exploration.
Wednesday, July 30, 2014
Summer Tips for Guinea Pigs: Help Keep Them Cool
It's time for more guinea pig tips! It's been hot lately. We usually run the air conditioning, but our piggy, Remnar, overheats easily. So, first, we make sure he has plenty of fresh water. His water dish sits on a couple of bricks I bought at the hardware store for 5 cents each. After he's done sprinting around the living room in the evenings, he likes to lay on the bricks and drink his water while he cools off.
During the day, if the heat gets really bad, I give him a cold pack to lay on. I've been selling rice hot/cold packs on my Etsy shop for a while now. My husband and I like to put the neck wraps in the freezer and use them to cool off at night. I decided to give Remnar his very own small rice pack. He likes to use it as a pillow.
For this purpose, the rice packs are much nicer than the chemical ones because they don't get too cold to touch with bare skin. They are just cold enough to feel refreshing. They stay cold for up to an hour, depending on the size of the pack and how hot the user is. I love that I don't have to worry if the piggy decides to nibble the cover a little. He shouldn't eat the rice, but it won't kill him if he gets a little bit (unlike the chemical packs).
Now, a video montage I put together to show off my little piggy's antics!
My apologies for the poor quality. If you are interested, the music is the intro theme from Kirby's Adventure. Stay cool, and enjoy your summer!
During the day, if the heat gets really bad, I give him a cold pack to lay on. I've been selling rice hot/cold packs on my Etsy shop for a while now. My husband and I like to put the neck wraps in the freezer and use them to cool off at night. I decided to give Remnar his very own small rice pack. He likes to use it as a pillow.
For this purpose, the rice packs are much nicer than the chemical ones because they don't get too cold to touch with bare skin. They are just cold enough to feel refreshing. They stay cold for up to an hour, depending on the size of the pack and how hot the user is. I love that I don't have to worry if the piggy decides to nibble the cover a little. He shouldn't eat the rice, but it won't kill him if he gets a little bit (unlike the chemical packs).
Now, a video montage I put together to show off my little piggy's antics!
My apologies for the poor quality. If you are interested, the music is the intro theme from Kirby's Adventure. Stay cool, and enjoy your summer!
Tuesday, June 3, 2014
Updates!
You know those people who just can't seem to grasp technology, no matter how hard they try? Well, I seem to be one of those people. I just got my first smartphone less than a month ago. My own mother got a smartphone before I did. In fact, if it weren't for my tech-savvy husband, my mother would probably own more hi-tech gadgets than I. It's not that I don't know how to use them, I just never see the need for more gadgets. Of course, now that I have a smartphone, I am finding a million and one incredible uses for it, most of which involve wasting large amounts of time. What a wonderful era we live in! Glad I'm finally getting with the times.
When it comes to art, I still prefer old-fashioned media. I have tried for years to learn how to do digital painting. Every time I try, I just get too frustrated to create anything worthwhile. Even if I draw something on paper first and then scan it, it never seems to turn out quite right for me. I had just about given up on digital painting until my husband, in a crazy attempt to help me expand my repertoir, bought me a digital drawing tablet for my birthday.
It's taken me a while to get up the nerve to even try the thing. I played around with the brushes a lot, tweaking them until they felt and looked right. After a couple months of reading and putting off the inevitable, I feel I'm finally ready to give it an honest try. I've been wanting to re-do the Cricket in the Ear logo for a long time, so I decided to make that my first project using only Gimp.
Nothing spectacular, but I am extremely happy with it. Tried to keep it similar to the old logo, but simpler and cleaner. I may still perform some minor changes before I make it official. As for the work-in-progress, feel free to leave any feedback in the comments! I'm feeling encouraged by this little project, so I'll keep trying new techniques. Eventually, maybe I'll get good enough to do some more advanced compositions.
As a bonus, I'd like to share a little logo my husband asked me to design for him:
He is interested in a new project called Pirate Box (here is the link if you are interested in reading about it). Basically, he used the Pirate Box software to modify a wireless router for offline file-sharing and message boards. He asked me to design a unique logo for his box. Sticking with the pirate theme, we decided to integrate his love of video games into the design as well. I think he's cute.
When it comes to art, I still prefer old-fashioned media. I have tried for years to learn how to do digital painting. Every time I try, I just get too frustrated to create anything worthwhile. Even if I draw something on paper first and then scan it, it never seems to turn out quite right for me. I had just about given up on digital painting until my husband, in a crazy attempt to help me expand my repertoir, bought me a digital drawing tablet for my birthday.
It's taken me a while to get up the nerve to even try the thing. I played around with the brushes a lot, tweaking them until they felt and looked right. After a couple months of reading and putting off the inevitable, I feel I'm finally ready to give it an honest try. I've been wanting to re-do the Cricket in the Ear logo for a long time, so I decided to make that my first project using only Gimp.
Nothing spectacular, but I am extremely happy with it. Tried to keep it similar to the old logo, but simpler and cleaner. I may still perform some minor changes before I make it official. As for the work-in-progress, feel free to leave any feedback in the comments! I'm feeling encouraged by this little project, so I'll keep trying new techniques. Eventually, maybe I'll get good enough to do some more advanced compositions.
As a bonus, I'd like to share a little logo my husband asked me to design for him:
![]() |
| Pirate Kirby wants to share treasures! |
He is interested in a new project called Pirate Box (here is the link if you are interested in reading about it). Basically, he used the Pirate Box software to modify a wireless router for offline file-sharing and message boards. He asked me to design a unique logo for his box. Sticking with the pirate theme, we decided to integrate his love of video games into the design as well. I think he's cute.
Tuesday, February 11, 2014
New Hot/Cold Pack Designs
I recently made each of my nieces and nephews a small hot/cold pack. Each one had a different fabric design, based on their favorite animals. I have so much leftover fabric, I've decided to put them up for sale on the store. Finally, some new products to list!
While I'm at it, I'm making some of the neckwrap versions in more "adult" designs. By "adult," I mean that I found some awesome Kermit the Frog and Star Trek fabric that I love and must use. (Planning on making a pillow from the scraps. It'll goes perfectly with our TOS throw rug!)
The hot/cold packs are in production at the moment, but I should have them all ready for sale by the end of February.
| This one's not new, but it fits the favorite animal theme |
| Again, not new... |
While I'm at it, I'm making some of the neckwrap versions in more "adult" designs. By "adult," I mean that I found some awesome Kermit the Frog and Star Trek fabric that I love and must use. (Planning on making a pillow from the scraps. It'll goes perfectly with our TOS throw rug!)
The hot/cold packs are in production at the moment, but I should have them all ready for sale by the end of February.
Monday, December 16, 2013
Star Trek Inspired Tea Cozy Part 2: Dome Style Cozy
Last week, I shared a quick tutorial on embroidering text. As promised, I'll now outline an easy way to make a felt, dome-style tea cozy.
First, measure the diameter and height of your teapot. Add an inch or two to allow for seams/wiggle room. Cut two rectangles on the fold of your felt (the fold will be the top of the cozy). Take something round, like a bowl or a plate, and use it to trim the two top corners.
If you are going to embroider anything on the cozy, now is the time. See my previous post on embroidering text.
With both pieces of fabric unfolded, line them up back-to-back. Stitch the two straight edges, leaving about a half inch seam allowance.
Fold it over and finish stitching the edges.
Now trim the seams within a quarter inch of the stitching.
Now make yourself a pot of tea and enjoy your handiwork!
First, measure the diameter and height of your teapot. Add an inch or two to allow for seams/wiggle room. Cut two rectangles on the fold of your felt (the fold will be the top of the cozy). Take something round, like a bowl or a plate, and use it to trim the two top corners.
| This is what it will look like opened up. You need two of these. |
If you are going to embroider anything on the cozy, now is the time. See my previous post on embroidering text.
With both pieces of fabric unfolded, line them up back-to-back. Stitch the two straight edges, leaving about a half inch seam allowance.
Fold it over and finish stitching the edges.
Now trim the seams within a quarter inch of the stitching.
Now make yourself a pot of tea and enjoy your handiwork!
Monday, December 9, 2013
Star Trek Inspired Tea Cozy Part 1: Embroidering Text
I decided last week to make a tea cozy inspired by Captain Picard's famous words: "Tea, Earl Grey, hot." There is nothing better than a hot cup of tea on a cold Winter day like today. The wind is furiously blowing leaves and branches all over the place outside! But I'm nice and warm with my cup of Earl Grey, enjoying the glow of the lights on my little Christmas tree. This is paradise.
This is going to be a two-part tutorial. Today, I'll outline an easy way to embroider text. Next week, I'll share how to make your own dome-style tea cozy.
If your embroidery project requires precision work, you are better off tracing your design using fabric pens. But, if your fabric is difficult to draw on, like the felt I used, the following technique works just fine. First print out a sample of what you want to embroider on regular computer paper. Once you get it sized the way you want, position it on the item and pin the paper in place.
Using a two-ply embroidery thread, outline your text using a split stitch. Here's how:
Make a stitch, then push your needle up through the middle of the stitch you just made. Make another stitch, and repeat this process all the way around each letter. The corners may be tricky to keep in line using the split stitch. Smaller stitches (unlike the ones in the picture above...) are easier to control. You can see that mine got progressively smaller as I progressed. Not great technique, but it has character.
The back will be messy, so plan on adding a lining or backing to your project.
When you are done stitching, gently tear away the paper. The perforations made from the needle will make this task pretty easy to accomplish.
For the tighter sections (like the middle of the "e" and the "a") you may need to use tweezers to pull the paper bits outs.
This technique will work fine with simple images as well, as long as you are not too worried about fine detail. Stay tuned for step-by-step instructions on how to make your own tea cozy!
This is going to be a two-part tutorial. Today, I'll outline an easy way to embroider text. Next week, I'll share how to make your own dome-style tea cozy.
If your embroidery project requires precision work, you are better off tracing your design using fabric pens. But, if your fabric is difficult to draw on, like the felt I used, the following technique works just fine. First print out a sample of what you want to embroider on regular computer paper. Once you get it sized the way you want, position it on the item and pin the paper in place.
Using a two-ply embroidery thread, outline your text using a split stitch. Here's how:
Make a stitch, then push your needle up through the middle of the stitch you just made. Make another stitch, and repeat this process all the way around each letter. The corners may be tricky to keep in line using the split stitch. Smaller stitches (unlike the ones in the picture above...) are easier to control. You can see that mine got progressively smaller as I progressed. Not great technique, but it has character.
The back will be messy, so plan on adding a lining or backing to your project.
When you are done stitching, gently tear away the paper. The perforations made from the needle will make this task pretty easy to accomplish.
For the tighter sections (like the middle of the "e" and the "a") you may need to use tweezers to pull the paper bits outs.
This technique will work fine with simple images as well, as long as you are not too worried about fine detail. Stay tuned for step-by-step instructions on how to make your own tea cozy!
Monday, November 11, 2013
Kuribo's Shoe Pixel Art Christmas Stocking
As I've mentioned, my husband is a Super Mario Bros. wizard. His idea of a relaxing evening is making a speed-run through Mario 2.
Last Christmas, we decided it was time to make him a stocking to replace the one with a teddy bear on it that his mom loaned to us. After a year of trial and error, I am finally satisfied with the end result! It's based on Kuribo's Shoe from Mario 3 (you know, that cool green boot that you get to hop around in). I added a Santa hat to make it more holiday-appropriate, and voila!
I went through so many different versions of this, I've lost count. I'll spare you the details and just say that I ended up hand-stitching each felt "pixel" in place, then hand-stitching the lining and backing as well.
I am offering these for sale on Etsy, though it may take me some extra time to process any orders. This ended up being a fairly time-consuming project. Now my husband wants a matching stocking with Mario in a pipe! I think it's a great idea.
Last Christmas, we decided it was time to make him a stocking to replace the one with a teddy bear on it that his mom loaned to us. After a year of trial and error, I am finally satisfied with the end result! It's based on Kuribo's Shoe from Mario 3 (you know, that cool green boot that you get to hop around in). I added a Santa hat to make it more holiday-appropriate, and voila!
I went through so many different versions of this, I've lost count. I'll spare you the details and just say that I ended up hand-stitching each felt "pixel" in place, then hand-stitching the lining and backing as well.
| I spent a couple days just cutting out 1/4 inch felt squares. |
| I drew up the design on graph paper before attempting to piece it together. |
| I used embroidery thread to attach each pixel. I quite like how it turned out. |
I am offering these for sale on Etsy, though it may take me some extra time to process any orders. This ended up being a fairly time-consuming project. Now my husband wants a matching stocking with Mario in a pipe! I think it's a great idea.
Sunday, May 26, 2013
Myth Busting Mustaches
In order to make up for not posting anything last week, I have prepared something very special this week. Prepare yourself for myth busting mustache style!
It helps if you read it in Jamie Hyneman's voice. And remember, these are all available for sale on my Etsy store. Thanks for reading.
Monday, April 22, 2013
A Quick Appliqué Tutorial
I apologize for skipping last week's post. The main cause for delay was the Baker to Vegas Challenge Cup Relay last weekend. My dad, my husband and I volunteered our ham radio skills to help in communications support for the race. We worked the last shift, 3am to 9am, for the Riverside Police Department's team. We had a great time, learned quite a bit, and met some really interesting people. Unfortunately, I was too tired to think of taking any photos. However, I do have a new project to share as a result of the event.
The week before the race, my dad came up with the brilliant idea to put our call signs on coffee cup cozies. I worked really hard to get them done in time for the event, so we could show them off to all the other hams that would be there. Here are the final products:
I had a hard time deciding on how to do the lettering. At first I though I would just paint them on. I've had bad experiences trying to make paint look good on felt. So I decided to try appliqué. I just recently started dabbling in appliqué. I had tried it once or twice before, but this project was a real challenge. All I can say is thank God for Wonder Under!
For those interested, I'll go ahead and outline the basic technique I used:
Iron the Wonder Under onto the back side of a contrasting color fabric. Then cut the letters out and take the paper backing off.
Line up the letters on the right side of the cozy (or whatever you want to appliqué them to). Once you have them positioned how you want them, iron them in place.
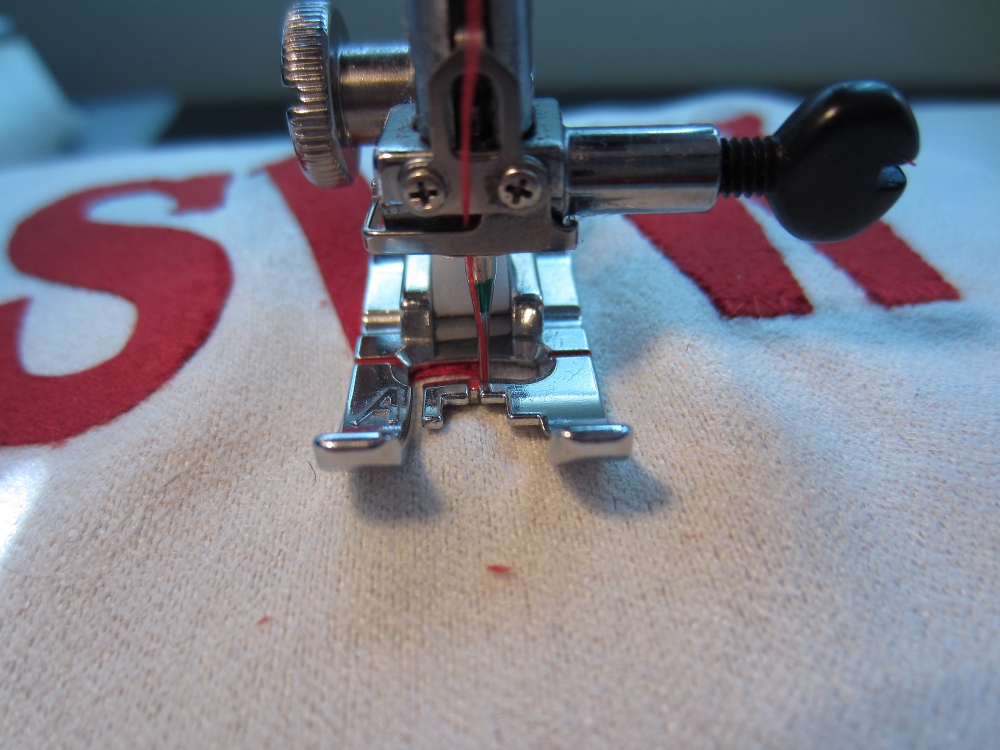
Set your sewing machine to a small-medium zig-zag stitch. Simply zig-zag around the edges!
When you come to a corner, put your needle in the fabric, lift the foot, and turn the fabric until the foot is lined up with the next edge. It may take some practice to get it to line up just right.
Curves are the trickiest! Depending on how tight the curve is, you'll need to lift the foot and turn the fabric every other stitch or so to keep it lined up properly. Make sure you keep the needle in the fabric every time you lift the pressure foot!
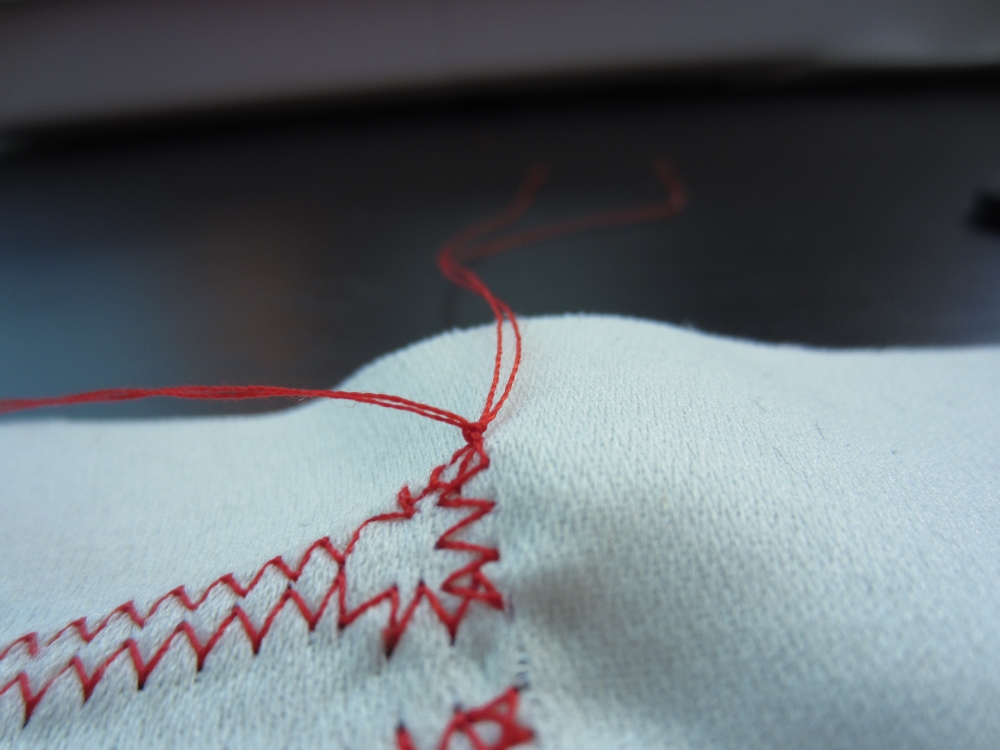
When you come to the end of a letter, turn the fabric over and pull all the threads to the wrong side of the fabric. (This is usually pretty easy if you pull on the trailing thread and use a thread ripper to coax the loop open on the other side. Once you have all 4 threads on the wrong side of the fabric, tie them in a knot to keep your beautiful stitching from coming loose.
Update 7/30/2013:
I've added a few photos to help explain the process a little better. These photos are from a different project you can take a look at here.
The week before the race, my dad came up with the brilliant idea to put our call signs on coffee cup cozies. I worked really hard to get them done in time for the event, so we could show them off to all the other hams that would be there. Here are the final products:
I had a hard time deciding on how to do the lettering. At first I though I would just paint them on. I've had bad experiences trying to make paint look good on felt. So I decided to try appliqué. I just recently started dabbling in appliqué. I had tried it once or twice before, but this project was a real challenge. All I can say is thank God for Wonder Under!
For those interested, I'll go ahead and outline the basic technique I used:
Iron the Wonder Under onto the back side of a contrasting color fabric. Then cut the letters out and take the paper backing off.
Line up the letters on the right side of the cozy (or whatever you want to appliqué them to). Once you have them positioned how you want them, iron them in place.
Set your sewing machine to a small-medium zig-zag stitch. Simply zig-zag around the edges!
When you come to a corner, put your needle in the fabric, lift the foot, and turn the fabric until the foot is lined up with the next edge. It may take some practice to get it to line up just right.
Curves are the trickiest! Depending on how tight the curve is, you'll need to lift the foot and turn the fabric every other stitch or so to keep it lined up properly. Make sure you keep the needle in the fabric every time you lift the pressure foot!
When you come to the end of a letter, turn the fabric over and pull all the threads to the wrong side of the fabric. (This is usually pretty easy if you pull on the trailing thread and use a thread ripper to coax the loop open on the other side. Once you have all 4 threads on the wrong side of the fabric, tie them in a knot to keep your beautiful stitching from coming loose.
Update 7/30/2013:
I've added a few photos to help explain the process a little better. These photos are from a different project you can take a look at here.
Subscribe to:
Posts (Atom)