As a pen and paper aficionado, my husband has a fairly impressive poly dice collection. He is also working on building a small collection for me to use. In preparation for our next campaign, I decided to make a couple of personalized pouches to keep our dice collection, as well as give us some room for expansion.
The pouches are basic drawstring bags with linings. I decided to add a little pocket to keep an eraser or token in, as well as a golf-pencil-sized pocket. It took me a couple tries to get the design right, so I thought it might me worthwhile to share.
Cut two 5"x11" rectangles, one out of your outer fabric and one out of your lining fabric. I used suede for the outside and satin for the lining. For the pocket, cut a smaller rectangle out of the lining fabric, 5"x3.25".
If you are going to appliqué anything on your pouch, now is the time to do so. See my previous blog post for a quick tutorial on appliqué. Just fold your outside fabric in half and center your letters on the right side of the fabric. Stitch them in place before you put the rest of the pouch together.
With your large rectangles folded in half and right sides facing in, cut a notch in one side an inch down from the top on both pieces of fabric. This will mark where the hole for the drawstring will be.
Next, do your pocket. Fold over one long edge into a quarter inch hem. It helps to iron it in place before you stitch it.
Now measure 3.5" down from the top of your lining. Place your pocket face-down and stitch along the bottom edge. Then fold the pocket back up iron that bottom edge so the pocket is facing the right way.
To make the pencil pocket, measure 1.25" from the side. Mark it with a pin and stitch in a straight line from top to bottom.
Now you can start putting the pouch together. With right side folded in, sew both the sides of your pouch together, making sure to stop and backstitch at the notch you made previously. Do this for both of your rectangles.
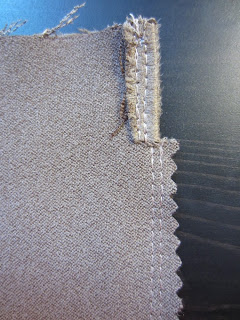
If you have a serger, or have access to one, you can use it for the side seams. If not, you can use pinking shears to cut the excess seam allowance and keep the edges from fraying too much. This is especially helpful if you are working with satin. Just make sure you don't cut beyond the notch on the one side.
 |
| I decided to add an extra line of stitching in the side seams, just to make sure it will hold up to long, arduous game nights. |
 |
| Not the best example, but this was my first attempt. :) |
 |
| Here is the lining, all ready to go. Make note, satin is extremely slippery and difficult to keep straight while stitching. Just be patient with it and use lots of pins! |
Now is the exciting part! Reach into the hole on the side of the pouch and pull the fabric through until your bag is turned completely right-side-out. Push the lining into bag and you are almost done!
Now pin the top edge of the bag in place and stitch a line about 5/8" down from the top (this should be right about where the opening for the drawstring starts). On my second bag (not the one pictured) I changed the thread on my machine so the top matched the lining and bottom matched the outside. As long as the tension on your machine is properly set, you should have an almost invisible seam.
You are now done with the sewing portion of this project! Cut a piece of cord to fit your bag, with about 5 or 6 inches of extra. Attach a large safety pin to one end and feed it through the opening on the top of your pouch. The safety pin just gives your something that's easier to find and hold onto during this process.
Once you've fed the cord all the way through, you can put both ends through a bead, or some other type of fastener. Tie off the ends to keep the bead from falling off. If your cord is made of nylon, you can melt the ends with a lighter. Otherwise, put a dab of glue on the ends. This will not only keep them from fraying, but it will also keep the knots from coming undone.
Now take your spiffy new bag to your next D&D campaign and make all your friends jealous!
Of course, if you aren't the sewing type, you can always mosey over to my Etsy store and place an order for one. Either way, you will be the most stylishly organized geek at game night!


No comments:
Post a Comment