Tuesday, July 30, 2013

Dice Pouch: How to Make a Drawstring Bag

My husband recently convinced me to start playing pen and paper RPGs with him. Lately, we have been playing Mutant Future. My husband is the Mutant Lord by default, as he has the most experience with RPGs in our little group. He is currently planning a campaign in which we will play androids who were made to destroy mutants. Either that, or we will all be mutant Care Bears with psychic powers that allow us to control the weather. I love this game!

As a pen and paper aficionado, my husband has a fairly impressive poly dice collection. He is also working on building a small collection for me to use. In preparation for our next campaign, I decided to make a couple of personalized pouches to keep our dice collection, as well as give us some room for expansion.


The pouches are basic drawstring bags with linings. I decided to add a little pocket to keep an eraser or token in, as well as a golf-pencil-sized pocket. It took me a couple tries to get the design right, so I thought it might me worthwhile to share.
 

Cut two 5"x11" rectangles, one out of your outer fabric and one out of your lining fabric. I used suede for the outside and satin for the lining. For the pocket, cut a smaller rectangle out of the lining fabric, 5"x3.25".


If you are going to appliqué anything on your pouch, now is the time to do so. See my previous blog post for a quick tutorial on appliqué. Just fold your outside fabric in half and center your letters on the right side of the fabric. Stitch them in place before you put the rest of the pouch together.

With your large rectangles folded in half and right sides facing in, cut a notch in one side an inch down from the top on both pieces of fabric. This will mark where the hole for the drawstring will be.

Next, do your pocket. Fold over one long edge into a quarter inch hem. It helps to iron it in place before you stitch it.


Now measure 3.5" down from the top of your lining. Place your pocket face-down and stitch along the bottom edge. Then fold the pocket back up iron that bottom edge so the pocket is facing the right way.


To make the pencil pocket, measure 1.25" from the side. Mark it with a pin and stitch in a straight line from top to bottom.


Now you can start putting the pouch together. With right side folded in, sew both the sides of your pouch together, making sure to stop and backstitch at the notch you made previously. Do this for both of your rectangles.


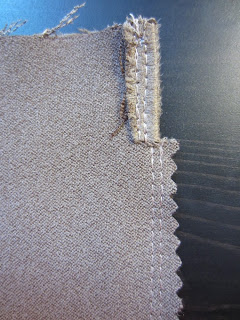
If you have a serger, or have access to one, you can use it for the side seams. If not, you can use pinking shears to cut the excess seam allowance and keep the edges from fraying too much. This is especially helpful if you are working with satin. Just make sure you don't cut beyond the notch on the one side.

I decided to add an extra line of stitching in the side seams, just to make sure it will hold up to long, arduous game nights.
Cut into the seam allowance from the notch all the way to where the seam ends. You should have a little flap on either side that you can now fold over and stitch in place.

Not the best example, but this was my first attempt. :)
Here is the lining, all ready to go. Make note, satin is extremely slippery and difficult to keep straight while stitching. Just be patient with it and use lots of pins!
Now turn the outer pouch right-side-out. Put it inside the lining, so right sides are facing each other. Make sure you have lined up the openings for your drawstring. Pin the top edges and stitch or serge them together.


Now is the exciting part! Reach into the hole on the side of the pouch and pull the fabric through until your bag is turned completely right-side-out. Push the lining into bag and you are almost done!
 

Now pin the top edge of the bag in place and stitch a line about 5/8" down from the top (this should be right about where the opening for the drawstring starts). On my second bag (not the one pictured) I changed the thread on my machine so the top matched the lining and bottom matched the outside. As long as the tension on your machine is properly set, you should have an almost invisible seam.


You are now done with the sewing portion of this project! Cut a piece of cord to fit your bag, with about 5 or 6 inches of extra. Attach a large safety pin to one end and feed it through the opening on the top of your pouch. The safety pin just gives your something that's easier to find and hold onto during this process.


Once you've fed the cord all the way through, you can put both ends through a bead, or some other type of fastener. Tie off the ends to keep the bead from falling off. If your cord is made of nylon, you can melt the ends with a lighter. Otherwise, put a dab of glue on the ends. This will not only keep them from fraying, but it will also keep the knots from coming undone.


Now take your spiffy new bag to your next D&D campaign and make all your friends jealous!


Of course, if you aren't the sewing type, you can always mosey over to my Etsy store and place an order for one. Either way, you will be the most stylishly organized geek at game night!

Monday, July 22, 2013

Root Beer Float Cupcakes

This weekend, my sister-in-law got married. (Congratulations!!) I had the great privilege to make cupcakes for the reception. Their theme was A&W (their initials), so we decided to do root beer float cupcakes. I scoured the internet for a suitable recipe, and tried a few different ones. Most ended up tasting more like spice cake than root beer. After a few less-than-satisfying attempts, I decided to try something different.

I took a basic marble cake recipe and threw in a couple small changes. These were the result:

The toppers have the wedding date "Since July 20, 2013," and their names.
And, of course, a giant cupcake for the couple to slice.
The hardest thing to find was the root beer extract. I ended up ordering some on Amazon. I went with Zatarain's and was very pleased, but I believe McCormick makes one as well.


Here is the recipe for a normal-sized batch (I tripled it to make 48 cupcakes plus the giant one).

Root Beer Float Cupcakes
(Print Recipe)

2 cups all-purpose flour
1 1/2 tsp baking powder
1/2 tsp baking soda
1/4 tsp salt
3/4 cups room-temperature butter
1 1/4 cups sugar
2 tsp vanilla
2 eggs
1 cup milk
1 Tbsp root beer extract

Line cupcake tins with baking cups. Combine flour, baking powder, baking soda, and salt and set aside. Beat together butter, sugar, and vanilla until nice and fluffy. Add eggs one at time. Alternate adding dry ingredients and milk until just combined.

Split the batter into two approximately equal portions (one will be your root beer and one will be your vanilla). Add the root beer extract to one portion. You may choose to add more or less, depending on taste.


Scoop some of the root beer batter into the baking cups, filling about 1/3 full. Top it with another scoop of the vanilla batter. Your cups should be about 2/3 full. Take a knife and swirl the batter together to create the marbling effect.


Bake cupcakes at 350° F for about 20 minutes or until toothpick inserted in middle comes out clean. If you have a giant cupcake pan and decide to use it, it will probably take about 45-50 minutes to bake completely.

Once they have cooled, scoop some vanilla icing on top!


Root Beer and Vanilla Icing

2/3 cup heavy whipping cream
1 vanilla bean
1 cup room-temperature butter
pinch of salt
1 tsp vanilla extract
1/4 tsp root beer extract
3 cups powdered sugar

Heat cream in a saucepan just until warm. Split vanilla bean in half. Scrape the seeds into the saucepan with the cream. You can toss the whole pod in and let it soak together with the lid on for while. I found it helpful to start this process before starting on the cupcakes, just to give it time for the flavors to meld and the cream to cool down before attempting to make the icing. Once the cream has cooled to room-temperature, go ahead and strain out the vanilla pod bits and set it aside.

Beat the butter and salt together. Very gradually add half of the powdered sugar. It is best to do this one spoonful at a time. It's tedious, but it helps keep your icing from getting gritty. If you want creamy icing, do this part slowly!

After you've added half the powdered sugar, pour in the cream and extracts. Continue to beat in remaining powdered sugar, one spoonful at a time. As you near the end of it, give it a taste. You may not need to add all of the sugar, depending on how sweet you want it.

Let your icing set in the fridge for at least an hour. You want it pretty solid in order to facilitate scooping.

Top with crushed root beer barrel candies and maybe a little straw! These were a huge hit at the wedding, and I'm sure they will be well-received at any summer gathering.


Enjoy!

Monday, July 1, 2013

Bernette Serger

It's time for a walk down memory lane. I have many fond memories of my grandmother teaching me to sew. My sisters and I would spend part of our summers with her. We would work long hours making outfits for ourselves and Christmas gifts for our parents. She taught us at a very young age how to use and care for a sewing machine. As a result, I am very comfortable with sewing machines.

The serger, however, scared me to death. If you don't know what a serger is, you should look at some YouTube videos. It's a machine that cuts and/or does an overlock stitch to finish the edge of piece of fabric. Suffice it to say it took a long time for me to get used to those knives and needles chopping away at the dress I had just spent so much time and love on. What if my hand slipped and I made it crooked? Or the fabric got bunched and I cut a big hole where there shouldn't be one? (I have made that fatal mistake on several occasions.)

When I inherited my grandmother's serger years ago, I was still unsure of it. When I was young and it came time to hem a project at Grandma's house, the serger would magically be threaded with the right color. So, when I tried to use it the first time on my own, I had to reverse-engineer how to thread it. At this point, a picture or two might be helpful:


Dealing with 4 threads, 2 knives, and 2 needles takes some serious skill
After a few years of practice, I grew to love this machine, even depend on it at times. Though, I never did learn how to properly clean it. I think that was my biggest mistake.

Grandma always took immaculate care of her machines. She would oil and clean them frequently and take them to get serviced regularly. I, on the other hand, have trouble remembering just to take out the trash. So, here we are about 6 years after I was entrusted with the care of this wonderful machine, and I'm just now getting it in for service. And that's only because it's not working. I'm a horrible person! I know!

Well, the nice man at the repair center told me it's an expensive fix. It has a broken drive gear, which will apparently be an expensive part. AND there is no guarantee he'll be able to find one, as this is such an old machine. I am just dying inside right now! How could I let this happen?

Well, I'm not sure if Grandma would be upset, or excited for an excuse to go buy a new one. I still haven't decided what to do yet. I might try to fix it, or I might trade it in for a new machine. I need to think on it a while.

There is one last cool thing I want to share about this machine. I hadn't given it much thought until the woman at the sewing center commented on it. Grandma's serger had a mat for the pedal, so it would stay in one place and you wouldn't have to chase it around the floor with your foot.


I always thought it was one piece, that it was built like that. But the woman at the store took off the mat so I could take it home (fewer items means less liability for them, I guess).


It's called a "pedal stall." She put velcro on the pedal to hold it onto the mat. I've looked and can't find anything quite like it. The woman at the store thought it was a car mat. I suppose you could use a car mat if you could find one small enough. I thought it was an odd little thing, but useful. Might be something worthwhile to investigate for my other machine.