Monday, April 29, 2013

Skyrim Quiet Book

My husband is a huge fan of the Elder Scrolls games; so when Skyrim came out, he was full of ideas for crafts based on the game. We plotted together on a Skyrim themed quiet book, which I started making quite some time ago. I still have not finished the project, but plan to in the near future. Here are a few of my favorite pages from the book so far:

The front cover. Will eventually say: The Dovahkiin Quiet Book.
"Who are you?"
Collect all the Nirnroots.
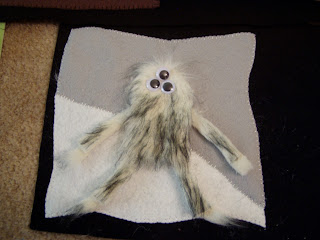
A googly-eyed frost troll!
Ride your gigantic horse through Skyrim.
I envision a whole line of geeky quiet books, so stay tuned for more to come!

Monday, April 22, 2013

A Quick Appliqué Tutorial

I apologize for skipping last week's post. The main cause for delay was the Baker to Vegas Challenge Cup Relay last weekend. My dad, my husband and I volunteered our ham radio skills to help in communications support for the race. We worked the last shift, 3am to 9am, for the Riverside Police Department's team. We had a great time, learned quite a bit, and met some really interesting people. Unfortunately, I was too tired to think of taking any photos. However, I do have a new project to share as a result of the event.

The week before the race, my dad came up with the brilliant idea to put our call signs on coffee cup cozies. I worked really hard to get them done in time for the event, so we could show them off to all the other hams that would be there. Here are the final products:


I had a hard time deciding on how to do the lettering. At first I though I would just paint them on. I've had bad experiences trying to make paint look good on felt. So I decided to try appliqué. I just recently started dabbling in appliqué. I had tried it once or twice before, but this project was a real challenge. All I can say is thank God for Wonder Under!

For those interested, I'll go ahead and outline the basic technique I used:
Trace the letters and numbers needed onto the bumpy side of some Wonder Under. (I used my laptop to get the font and size I wanted, then traced the letters directly from the screen.)

Iron the Wonder Under onto the back side of a contrasting color fabric. Then cut the letters out and take the paper backing off.


Line up the letters on the right side of the cozy (or whatever you want to appliqué them to). Once you have them positioned how you want them, iron them in place.

Set your sewing machine to a small-medium zig-zag stitch. Simply zig-zag around the edges!

When you come to a corner, put your needle in the fabric, lift the foot, and turn the fabric until the foot is lined up with the next edge. It may take some practice to get it to line up just right.


Curves are the trickiest! Depending on how tight the curve is, you'll need to lift the foot and turn the fabric every other stitch or so to keep it lined up properly. Make sure you keep the needle in the fabric every time you lift the pressure foot!

When you come to the end of a letter, turn the fabric over and pull all the threads to the wrong side of the fabric. (This is usually pretty easy if you pull on the trailing thread and use a thread ripper to coax the loop open on the other side. Once you have all 4 threads on the wrong side of the fabric, tie them in a knot to keep your beautiful stitching from coming loose.


Update 7/30/2013:
I've added a few photos to help explain the process a little better. These photos are from a different project you can take a look at here.

Monday, April 8, 2013

Hot/Cold Packs in the Oven

A friend of mine does not own a microwave. Unheard of, I know. She, very reasonably, assumed that she would not be able to make use of the rice heat packs I recently started making. Then, I had this crazy idea to try heating it in the oven. Sounds like a bad idea? I had visions of the thing spontaneously combusting. I don't know why, but people now (including myself) seem to have an unreasonable fear of conventional ovens. I always forget that, 60 years ago, people managed to heat everything either on the stove top or in the oven. Keeping this in mind, I tried testing the old-fashioned method.

Though the microwave is certainly the easiest and quickest option, my regular gas oven worked just as well. To be safe, I wrapped one of the small packs in foil, preheated the oven to 300° F, and warmed it up for 15 minutes. (Note: the larger ones will need more time.) Not only did it not catch on fire, the heat actually lasted a bit longer than one that I microwaved at the same time. The downside is it takes a lot longer to heat the thing up. At least we all know it's an option if the microwave is out of commission.

Tuesday, April 2, 2013

Grand Opening

Yesterday, I finally opened my Etsy shop: CricketInTheEar! Take a look and let me know what you think. As I am new to this online selling thing, I am very open to any suggestions anyone might have.

Right now, I have very few products listed. Although, I have about a million ideas and I'm currently working on new products to list. In fact, my Dad had a brilliant suggestion to list made-to-order cup cozies with ham radio call signs on them. I haven't decided yet if I should paint the lettering, or spend a little extra time and do appliqué. I do not have the equipment to do embroidery currently, unless I do it by hand. So many possibilities!

So far, in the 24 hours the shop has been open, everyone's favorite item seems to be the Mario World cup cozy.


Thanks to my wonderful husband for that idea! He actually had a lot of input on the design and color scheme.

Next big project: Dr. Who Quiet Book! So many people I know are so excited about the new season, I figure they'll at least get a kick out of it.