Last year, I shared a Star Trek hot/cold pack that I was commissioned to make. I had so much fun working closely with my customer to make a product that fit his needs exactly. I have recently had the opportunity to do more commissioned projects that I would love to show off.
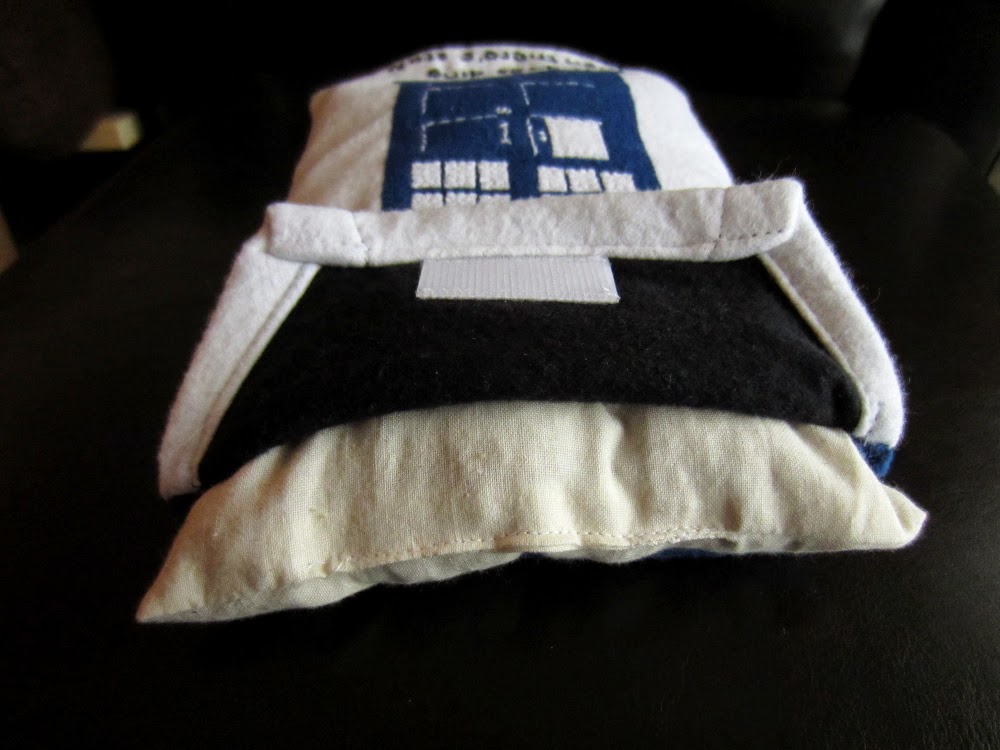
The first was for another Etsy customer who wanted the perfect Christmas gift for an avid Doctor Who fan. Through the course of conversation, I discovered that the recipient of this hot/cold pack and I both favor the 10th Doctor. (Who doesn't, right?) So, we collaborated on a quote to include in the design: "This is my Timey-Wimey detector. It goes ding when there's stuff." Classic David Tennant.
On a side note, this customer was pure joy to work with. It felt so good to make something that was met with so much appreciation. It is incredibly uplifting to be able to do something I love and have the finished product be so well-received. That experience reminded me why I started this business to begin with. As a result, I've been re-thinking my business strategy. I would love to do more custom, made-to-order items, as they have been the most rewarding part of having an Etsy shop. Long story short, I will be re-vamping my shop this year to feature more one-of-a-kind products. I'll be phasing out some of the products I've made in bulk. That means I need to purge some inventory; so if you've had your eye on any of the ready-to-ship items, get ready for some huge sales!
This second hot/cold pack was more of a personal project. I made it as a gift for one of my own close friends. When we were in high school, we would frequently crochet together.
Although she now lives on the opposite side of the country, I still like
to think of us as craft buddies. We are both sci-fi geeks, always have been and always will be. More specifically, we both watched and loved all things Stargate when we were in high school. There will always be a special place in my heart for SG-1, partly because of the memories I have of the two of us watching and talking about the show together. Because we share such a fondness for Stargate, I thought it would be appropriate to make her a Teal'c inspired gift.
Happy anniversary, dear friend, and congratulations on the birth of your beautiful daughter!
Tuesday, March 3, 2015
Tuesday, February 10, 2015
A1 and Brown Sugar Bacon Wrapped Chicken Skewers
It was Groundhog day, our fifth wedding anniversary. My husband and I were camping in Joshua Tree, expecting very few other campers because it was the Monday following Super Bowl Sunday; who else goes camping on a Monday in February? We were enjoying the sun and solitude, catching up on some reading, when a giant RV full of what appeared to be rambunctious college guys pulled up and parked in the space across the street from us.
Slightly annoyed because their RV was blocking our view of the sunset, we started preparing dinner. On the menu that night was hobo stew--a family favorite and camping staple consisting of ground beef and vegetables cooked in foil pouches over the campfire.
As we were getting ready to cook our stew, one of our new neighbors came over and asked if we had any pepper we could spare. Of course, I am always over-prepared for every situation. So, I handed him the miniature, made-for-camping salt and pepper shaker I had just bought at REI. A few minutes later, a different neighbor (this one was shirtless and noticeably drunk) returned with our pepper shaker, empty. He handed me a bottle of red wine as he explained that he didn't realize how small the container was. We definitely got the better end of that deal, and a great story to tell!
Later, as we enjoyed our wine and stew, we were serenaded by a man who was evidently hotboxing in the space next to us. I suppose the desert is a prime location for that sort of thing. We thought he was singing hymns at first, but I'm pretty sure he started making up songs, or at least improvising lyrics, as it got later. It was a very memorable evening.
My husband and I have been on a few backpacking trips together, but this was our first experience staying at an actual campground, just the two of us. We both have fond memories of family camping trips, so it was nice to be able to make some similar memories together.
Every evening was an absolute delight, between campfires, an endless supply of snacks, even our rowdy neighbors and their RV full of wine. My parents even joined us the first night and brought their telescope along. The full moon was beautiful, though it made stargazing a little difficult. However, we did get to see Jupiter and some of its moons.
Even with an all-day hike on Sunday, I managed to gain weight on this trip. I can honestly say, though, that I thoroughly enjoyed every ounce of it. Seriously. Check out the view we had every night while we cooked dinner.
As a last-minute addition to our camping menu, I put together some bacon-wrapped chicken skewers. I was going to be good and do veggie skewers, but decided against it when I discovered we had an open package of bacon in the fridge. (I didn't want it to go bad while we were on our trip... You believe me, right?) I poured some A1 and brown sugar on the skewers, let them marinate in the ice chest for two days, then cooked them over our campfire. The result was magical!
A1 and Brown Sugar Bacon Wrapped Chicken Skewers
(Print Recipe)
6 wooden skewers
3 Chicken Breasts
6 slices bacon
1/2 cup A1 Sauce
1/4 cup brown sugar
Cut chicken into bite-sized cubes. Slide one end of a slice of bacon onto a skewer so that it hangs close to the tip.
Follow with a piece of chicken, then pull the bacon up and slide everything down an inch or so.
Repeat until you reach the end of the bacon slice. I ended up with 6-7 pieces of chicken per skewer.
Trim a few inches off the pointed side of the skewers. This is for two reasons: so they will fit easily into a gallon-sized re-sealable bag, and so they won't tear giant holes in said bag. Just in case, I recommend double-bagging the skewers to guard against leakage, especially if you plan on transporting it anywhere.
Before you seal them in, mix the brown sugar and A1 together and pour it over the skewers. Close the bag(s), then gently work the whole concoction until the marinade covers all the skewers. Keep in the fridge or ice chest until ready to cook, up to 4 days.
In my opinion, these are best grilled, but they are also very good baked. Grill on high, or over a campfire grate lined with foil, for 20-30 minutes, turning every 5 minutes.
Or, bake on a cookie sheet lined with foil at 375° F for 30-45 minutes, flipping after 20 minutes. They are done when the bacon starts to crisp and the marinade caramelizes.
These are so easy to prepare ahead of time, and they taste amazing after a long day of hiking. I will make these for every camping trip I embark on, forever.
Slightly annoyed because their RV was blocking our view of the sunset, we started preparing dinner. On the menu that night was hobo stew--a family favorite and camping staple consisting of ground beef and vegetables cooked in foil pouches over the campfire.
As we were getting ready to cook our stew, one of our new neighbors came over and asked if we had any pepper we could spare. Of course, I am always over-prepared for every situation. So, I handed him the miniature, made-for-camping salt and pepper shaker I had just bought at REI. A few minutes later, a different neighbor (this one was shirtless and noticeably drunk) returned with our pepper shaker, empty. He handed me a bottle of red wine as he explained that he didn't realize how small the container was. We definitely got the better end of that deal, and a great story to tell!
Later, as we enjoyed our wine and stew, we were serenaded by a man who was evidently hotboxing in the space next to us. I suppose the desert is a prime location for that sort of thing. We thought he was singing hymns at first, but I'm pretty sure he started making up songs, or at least improvising lyrics, as it got later. It was a very memorable evening.
My husband and I have been on a few backpacking trips together, but this was our first experience staying at an actual campground, just the two of us. We both have fond memories of family camping trips, so it was nice to be able to make some similar memories together.
Every evening was an absolute delight, between campfires, an endless supply of snacks, even our rowdy neighbors and their RV full of wine. My parents even joined us the first night and brought their telescope along. The full moon was beautiful, though it made stargazing a little difficult. However, we did get to see Jupiter and some of its moons.
Even with an all-day hike on Sunday, I managed to gain weight on this trip. I can honestly say, though, that I thoroughly enjoyed every ounce of it. Seriously. Check out the view we had every night while we cooked dinner.
| Don't mind my greasy hair. That's just part of the camping experience. |
As a last-minute addition to our camping menu, I put together some bacon-wrapped chicken skewers. I was going to be good and do veggie skewers, but decided against it when I discovered we had an open package of bacon in the fridge. (I didn't want it to go bad while we were on our trip... You believe me, right?) I poured some A1 and brown sugar on the skewers, let them marinate in the ice chest for two days, then cooked them over our campfire. The result was magical!
A1 and Brown Sugar Bacon Wrapped Chicken Skewers
(Print Recipe)
6 wooden skewers
3 Chicken Breasts
6 slices bacon
1/2 cup A1 Sauce
1/4 cup brown sugar
Cut chicken into bite-sized cubes. Slide one end of a slice of bacon onto a skewer so that it hangs close to the tip.
Follow with a piece of chicken, then pull the bacon up and slide everything down an inch or so.
Repeat until you reach the end of the bacon slice. I ended up with 6-7 pieces of chicken per skewer.
Trim a few inches off the pointed side of the skewers. This is for two reasons: so they will fit easily into a gallon-sized re-sealable bag, and so they won't tear giant holes in said bag. Just in case, I recommend double-bagging the skewers to guard against leakage, especially if you plan on transporting it anywhere.
Before you seal them in, mix the brown sugar and A1 together and pour it over the skewers. Close the bag(s), then gently work the whole concoction until the marinade covers all the skewers. Keep in the fridge or ice chest until ready to cook, up to 4 days.
In my opinion, these are best grilled, but they are also very good baked. Grill on high, or over a campfire grate lined with foil, for 20-30 minutes, turning every 5 minutes.
Or, bake on a cookie sheet lined with foil at 375° F for 30-45 minutes, flipping after 20 minutes. They are done when the bacon starts to crisp and the marinade caramelizes.
These are so easy to prepare ahead of time, and they taste amazing after a long day of hiking. I will make these for every camping trip I embark on, forever.
Friday, December 19, 2014
White Hot Chocolate Mix
It is a well known fact that my mother is a fantastic cook. Growing up, all my friends loved to hang out at our house because of all the great food. Of course, Christmas has always been Mom's shining moment. Between the thousands of cookies she bakes, and the candied bacon and sticky buns on Christmas morning, our family is easily the best-fed in the nation every December 25th.
One of my favorite Christmas treats growing up was white hot chocolate. Mom would make it with fresh ingredients on the stove. I, on the other hand, prefer instant gratification. I like to have cocoa mix on hand for whenever the mood strikes. Sure, regular cocoa mix is great, but sometimes you just want something a little more special, without having to make too much extra effort. So, here is my version of this amazing holiday beverage.
White Hot Chocolate Mix
(Print Recipe)
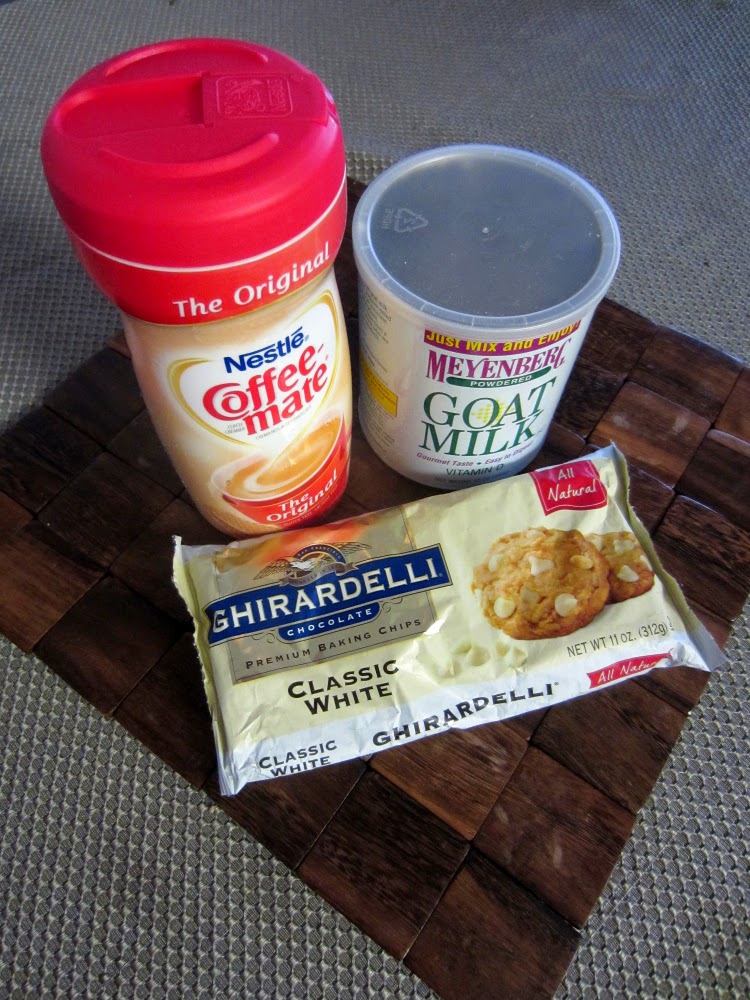
11 oz bag white chocolate chips
1 1/2 cups powdered milk
1 cup powdered non-dairy creamer
1 cup powdered sugar
1/2 tbsp cinnamon
1 tsp nutmeg
Finely chop the chocolate chips in a food processor or blender.
Add remaining ingredients and blend together.
Stir 3 tbsp of mix into 8 oz hot water. Store mix in an airtight container.
Just a few notes about the ingredients.
If you are lactose intolerant, look for goat milk powder. It is a little easier to digest. I have a very mild intolerance, so using goat milk instead of cow milk usually does the trick for me. Goat milk is slightly sour tasting. It is pretty noticeable with the white chocolate, so if you are not used to the taste, you might want to add a little extra powdered sugar.
If you really want something different, try substituting the cinnamon and nutmeg with a couple of candy canes. Grind them up with the chocolate chips and you have instant peppermint white hot chocolate mix! This makes an easy, festive gift, as well!
Merry Christmas!
One of my favorite Christmas treats growing up was white hot chocolate. Mom would make it with fresh ingredients on the stove. I, on the other hand, prefer instant gratification. I like to have cocoa mix on hand for whenever the mood strikes. Sure, regular cocoa mix is great, but sometimes you just want something a little more special, without having to make too much extra effort. So, here is my version of this amazing holiday beverage.
White Hot Chocolate Mix
(Print Recipe)
11 oz bag white chocolate chips
1 1/2 cups powdered milk
1 cup powdered non-dairy creamer
1 cup powdered sugar
1/2 tbsp cinnamon
1 tsp nutmeg
Finely chop the chocolate chips in a food processor or blender.
Add remaining ingredients and blend together.
Stir 3 tbsp of mix into 8 oz hot water. Store mix in an airtight container.
Just a few notes about the ingredients.
If you are lactose intolerant, look for goat milk powder. It is a little easier to digest. I have a very mild intolerance, so using goat milk instead of cow milk usually does the trick for me. Goat milk is slightly sour tasting. It is pretty noticeable with the white chocolate, so if you are not used to the taste, you might want to add a little extra powdered sugar.
If you really want something different, try substituting the cinnamon and nutmeg with a couple of candy canes. Grind them up with the chocolate chips and you have instant peppermint white hot chocolate mix! This makes an easy, festive gift, as well!
Merry Christmas!
Saturday, December 13, 2014
Turkey, Turkey, and More Turkey
Another Thanksgiving has come and gone. Now what will you do with all that leftover Turkey? Once all the sides are gone, I inevitably have a surplus of turkey meat.
The last few weeks have been extremely busy for me, so we are well past Thanksgiving by now and busy preparing for Christmas. You may be done with your leftovers at this point. I, on the other hand, just managed to finish off all of mine today. It took three weeks, but I did it! And that was after I divided all the loot with the rest of the family! That's what I get for buying a 22 pound Costco turkey.
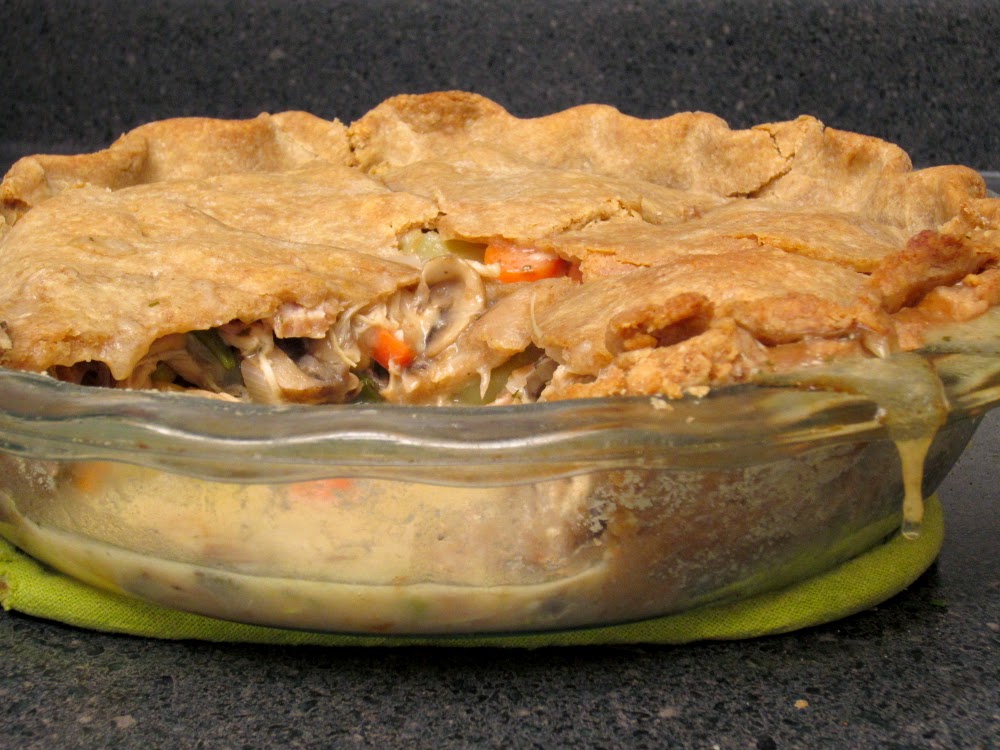
So, for next year's planning purposes, here are two great recipes to help you use up those leftovers. The first is really a classic: Day After Thanksgiving Deep Dish Turkey Pot Pie. I never get tired of pot pie. Plus, you can easily freeze one or two for later.
Day After Thanksgiving Deep Dish Turkey Pot Pie
(Print Recipe)
Filling:
2 Tbsp butter
1/2 onion, chopped
1/4 cup sliced mushrooms
2 Tbsp flour
1 tsp salt
1 cup milk
1 cup leftover gravy
1 cup leftover turkey, shredded
1 stalk celery, chopped
2 large carrots (or about 10 baby carrots), chopped
1 medium potato
1/4 cup frozen peas
1/4 cup frozen corn
1/2 cup snap peas or green beans
In a large microwavable bowl, cover celery, carrots, potato, peas, and corn with water. Microwave on high at 5-minute intervals for 15-20 minutes, or until carrots and potatoes are soft.
In a large skillet, melt butter. Sautee onion and mushrooms. Stir in the flour and salt.
Quickly whisk in the milk and gravy. When thick and bubbly, turn off heat.
Stir in the turkey. Drain vegetables and stir into the filling.
Crust:
2 cups flour
1/2 tsp salt
1/4 cup olive oil
1/4 cup ice water
Mix flour and salt with a fork. (I use one cup white, one cup wheat flour.) Whisk oil and water with an ice cube until thick.
Pour oil mixture into flour and mix with a fork. Divide into 2 balls. Roll the first on a floured surface. Using a rolling pin to lift it, lay the dough in the pie plate. Spoon in the filling.
Roll the second ball of dough and lay it on top of the pie. Fold and crimp the edge.
Use a fork or knife to make several holes in the top of the pie. Bake at 400° F for 30 minutes, or until crust is golden brown.
This recipe makes one deep dish pie. Multiply as necessary. Or, if you have two regular pie plates, just double the crust.
The second recipe is a new one I tried out this year with surprisingly tasty results! Turkey Pumpkin Chili. The pumpkin makes it nice and thick. My husband didn't even know there was pumpkin in it until I told him, after he raved about how good it was, of course!
Turkey Pumpkin Chili
(Print Recipe)
1 can black beans
1 can pinto beans
OR 1 lb (about 2 cups) raw beans, soaked in water overnight
1 lb ground turkey
14 oz turkey sausage
2 cups turkey stock
14 oz can (about 1 1/2 cups) pumpkin puree
12 oz bottle beer
14 oz can diced tomato
8 oz can tomato sauce
3 cloves garlic
2 jalapenos, diced
1 small onion, diced
2 tsp garlic salt
1/2 tsp red pepper flakes
2 tsp cumin
1/2 tsp corriander
1/2 tsp tumeric
If soaking beans, drain and rinse them before cooking. In a skillet, brown the ground turkey.
Now combine all ingredient. You can boil it in a large stock pot for an hour, until beans are soft. Or put it in a crock pot and cook on high for 5-6 hours, or low for 8-9 hours.
This is a great meal to throw in the crock pot before work. I love coming home to the smell of dinner ready to eat!
The last few weeks have been extremely busy for me, so we are well past Thanksgiving by now and busy preparing for Christmas. You may be done with your leftovers at this point. I, on the other hand, just managed to finish off all of mine today. It took three weeks, but I did it! And that was after I divided all the loot with the rest of the family! That's what I get for buying a 22 pound Costco turkey.
So, for next year's planning purposes, here are two great recipes to help you use up those leftovers. The first is really a classic: Day After Thanksgiving Deep Dish Turkey Pot Pie. I never get tired of pot pie. Plus, you can easily freeze one or two for later.
Day After Thanksgiving Deep Dish Turkey Pot Pie
(Print Recipe)
Filling:
2 Tbsp butter
1/2 onion, chopped
1/4 cup sliced mushrooms
2 Tbsp flour
1 tsp salt
1 cup milk
1 cup leftover gravy
1 cup leftover turkey, shredded
1 stalk celery, chopped
2 large carrots (or about 10 baby carrots), chopped
1 medium potato
1/4 cup frozen peas
1/4 cup frozen corn
1/2 cup snap peas or green beans
In a large microwavable bowl, cover celery, carrots, potato, peas, and corn with water. Microwave on high at 5-minute intervals for 15-20 minutes, or until carrots and potatoes are soft.
In a large skillet, melt butter. Sautee onion and mushrooms. Stir in the flour and salt.
Quickly whisk in the milk and gravy. When thick and bubbly, turn off heat.
Stir in the turkey. Drain vegetables and stir into the filling.
Crust:
2 cups flour
1/2 tsp salt
1/4 cup olive oil
1/4 cup ice water
Mix flour and salt with a fork. (I use one cup white, one cup wheat flour.) Whisk oil and water with an ice cube until thick.
Pour oil mixture into flour and mix with a fork. Divide into 2 balls. Roll the first on a floured surface. Using a rolling pin to lift it, lay the dough in the pie plate. Spoon in the filling.
Roll the second ball of dough and lay it on top of the pie. Fold and crimp the edge.
Use a fork or knife to make several holes in the top of the pie. Bake at 400° F for 30 minutes, or until crust is golden brown.
This recipe makes one deep dish pie. Multiply as necessary. Or, if you have two regular pie plates, just double the crust.
The second recipe is a new one I tried out this year with surprisingly tasty results! Turkey Pumpkin Chili. The pumpkin makes it nice and thick. My husband didn't even know there was pumpkin in it until I told him, after he raved about how good it was, of course!
Turkey Pumpkin Chili
(Print Recipe)
1 can black beans
1 can pinto beans
OR 1 lb (about 2 cups) raw beans, soaked in water overnight
1 lb ground turkey
14 oz turkey sausage
2 cups turkey stock
14 oz can (about 1 1/2 cups) pumpkin puree
12 oz bottle beer
14 oz can diced tomato
8 oz can tomato sauce
3 cloves garlic
2 jalapenos, diced
1 small onion, diced
2 tsp garlic salt
1/2 tsp red pepper flakes
2 tsp cumin
1/2 tsp corriander
1/2 tsp tumeric
If soaking beans, drain and rinse them before cooking. In a skillet, brown the ground turkey.
Now combine all ingredient. You can boil it in a large stock pot for an hour, until beans are soft. Or put it in a crock pot and cook on high for 5-6 hours, or low for 8-9 hours.
This is a great meal to throw in the crock pot before work. I love coming home to the smell of dinner ready to eat!
Wednesday, November 19, 2014
Game Grumps Cross Stitch Ornaments
For the last week, I've been begging my husband to let me put up our Christmas tree. Not necessarily because I'm an impatient Christmas fanatic, although I have been guiltily listening to Christmas music in the car ever since KOST 103.5 started playing it nonstop. I wanted to photograph some ornaments I made so I could list them on my store before Black Friday. I think he secretly wanted to have the tree up, too; once I got started, he got into the Christmas spirit with me. We even had hot chocolate to celebrate the occasion.
Yes, that is white hot chocolate, from a homemade mix, a recipe I adapted from one my mom used to make during the holidays. Soon I will share it with the world on this blog. I did promise to wait until after Thanksgiving to put all the ornaments on the tree. The only ones that get to stay are these:
I was going to wait and give them to my husband as a surprise Christmas present; then I ended up asking his advice on color choice and so forth. Surprise ruined. But, now that I don't have to worry about him finding out, I get to share the patterns! After lots of graph paper, more graph paper, and a few hours on gimp, I bring you these Kirby Game Grumps cross-stitch patterns!
Egoraptor
JonTron
Using 7-count plastic canvas, your favorite yarn (2 strands if it's thin), and a basic cross stitch, the finished product is roughly 3 inches square. Once you have both sides completed, just cut them out (use the border in the patterns for reference). Then, stitch them together by looping the yarn around the edges. It usually takes several stitches in each edge square, and re-tracing around the corners, in order to cover all the plastic. Attach a ribbon to hang, and you're done! Easy gift for the gamer geek in your life.
Yes, that is white hot chocolate, from a homemade mix, a recipe I adapted from one my mom used to make during the holidays. Soon I will share it with the world on this blog. I did promise to wait until after Thanksgiving to put all the ornaments on the tree. The only ones that get to stay are these:
I was going to wait and give them to my husband as a surprise Christmas present; then I ended up asking his advice on color choice and so forth. Surprise ruined. But, now that I don't have to worry about him finding out, I get to share the patterns! After lots of graph paper, more graph paper, and a few hours on gimp, I bring you these Kirby Game Grumps cross-stitch patterns!
Egoraptor
JonTron
Using 7-count plastic canvas, your favorite yarn (2 strands if it's thin), and a basic cross stitch, the finished product is roughly 3 inches square. Once you have both sides completed, just cut them out (use the border in the patterns for reference). Then, stitch them together by looping the yarn around the edges. It usually takes several stitches in each edge square, and re-tracing around the corners, in order to cover all the plastic. Attach a ribbon to hang, and you're done! Easy gift for the gamer geek in your life.
Friday, October 10, 2014
5 Homemade Almond Ice Cream Recipes
My family has the ice cream gene. We love ice cream, especially when it involves chocolate sauce, whipped cream, and cherries on top. Sadly, I've discovered I am both lactose and soy intolerant, which makes eating ice cream a not-so-pleasant experience. Recently, I have been
buying almond ice cream at the grocery store when I can find it. I'm always a little disappointed when I have to pass up the Moose Tracks
and pick one of three boring flavors of almond ice cream, none of which are chocolate. Not
only is it hard to find good flavors, it is prohibitively expensive to buy on a regular basis. It also contains additives you can easily avoid by making it yourself. With a
little patience, it is possible to make an affordable, lactose-free,
soy-free ice cream in whatever flavor you could possibly want.
The following recipes have been husband-tested and approved! His favorite is the Chunky Monkey. I can't choose a favorite. I like them all.
Almond Ice Cream Base
(Print Recipe)
3 cups homemade almond milk
1/3-1/2 cup sugar, depending on preference and the sweetness level of whatever goodies you want to add to it.
Bring milk to a boil. Stir in the sugar. Lower the heat as low as your stove will allow and let it simmer for at least an hour and a half. You may want to walk by occasionally and stir it, but patience is the key here! You want to reduce the milk to about 2/3 it's original volume. Once the milk thickly coats the back of a spoon, it's ready.
You are basically making sweetened condensed almond milk (good to know for other baking projects that call for sweetened condensed milk). Add whatever flavors you want and chill in the fridge overnight. My favorite flavors to add are cocoa powder, peanut butter powder, and almond extract.
Once cool, freeze in an ice cream maker according to manufacturer's instructions. Add any nuts, fruit, or chocolate pieces when the ice cream reaches soft-serve consistency.
Transfer to a plastic container and ripen in the freezer until solid.
If you don't have an ice cream maker, simply move the chilled mixture to a shallow container and freeze it, stirring every half hour for about 3 hours, until ice cream becomes difficult to stir. Pay careful attention to the edges, being sure to scrape and mix any frozen portions thoroughly with the rest. Add any nuts, fruit, or chocolate pieces when the ice cream reaches soft-serve consistency. Continue to freeze until solid.
Mexican Chocolate Almond Ice Cream
(Print Recipe)
3 cups unsweetened almond milk
1/2 cup sugar
1 stick cinnamon
2 tbsp cocoa powder
Dash of cayenne (optional)
Place milk and cinnamon stick in a saucepan.
Bring to boil. Stir in the sugar. Lower the heat and let it simmer for an hour and a half, stirring occasionally. Once mixture reduces to about 2/3 its original volume, and thickly coats the back of a spoon, remove from heat.
Remove the cinnamon stick. Whisk cocoa powder into the milk.
If you are feeling particularly adventurous, stir in a dash of cayenne. Chill in the fridge overnight.
Once cool, freeze in an ice cream maker according to manufacturer's instructions. Ripen in the freezer until solid.
If you don't have an ice cream maker, simply move the chilled mixture to a shallow container and freeze it, stirring every half hour for about 3 hours, until ice cream becomes difficult to stir. Pay careful attention to the edges, being sure to scrape and mix any frozen portions thoroughly with the rest. Continue to freeze until solid.
Optionally dust with ground cinnamon or nutmeg before serving.
Chunky Monkey Almond Ice Cream
(Print Recipe)
3 cups unsweetened almond milk
1/3 cup sugar
1 1/2 tsp vanilla
1 banana
1/2 cup chocolate chips
1/4 cup chopped walnuts
Cut the banana into bite-sized chunks. Flash freeze by placing the chunks on a plate lined with parchment or waxed paper. Make sure they are mostly not touching; otherwise they will stick together, defeating the purpose of flash freezing. Keep in freezer for several hours. Once frozen, transfer to a sealable bag or container until you are ready to use.
Bring milk to boil. Stir in the sugar and vanilla. Lower the heat and let it simmer for an hour and a half, stirring occasionally. Once mixture reduces to about 2/3 its original volume, and thickly coats the back of a spoon, remove from heat. Chill in the fridge overnight.
Once cool, freeze in an ice cream maker according to manufacturer's instructions. Add the banana, chocolate chips, and walnuts once the ice cream has reached soft-serve consistency. Ripen in the freezer until solid.
If you don't have an ice cream maker, simply move the chilled mixture to a shallow container and freeze it, stirring every half hour for about 3 hours, until ice cream becomes difficult to stir. Pay careful attention to the edges, being sure to scrape and mix any frozen portions thoroughly with the rest. Add the banana, chocolate chips, and walnuts once the ice cream has reached soft-serve consistency. Continue to freeze until solid.
Mint Chocolate Chip Almond Ice Cream
(Print Recipe)
3 cups unsweetened almond milk
1/2 cup sugar
2 tsp mint extract
1 tbsp chopped, fresh mint leaves
1 cup chocolate chips
Bring milk to boil. Stir in the sugar and mint. Lower the heat and let it simmer for an hour and a half, stirring occasionally. Once mixture reduces to about 2/3 its original volume, and thickly coats the back of a spoon, remove from heat. Chill in the fridge overnight.
Once cool, freeze in an ice cream maker according to manufacturer's instructions. Add the chocolate chips and mint leaves once the ice cream has reached soft-serve consistency. Ripen in the freezer until solid.
If you don't have an ice cream maker, simply move the chilled mixture to a shallow container and freeze it, stirring every half hour for about 3 hours, until ice cream becomes difficult to stir. Pay careful attention to the edges, being sure to scrape and mix any frozen portions thoroughly with the rest. Add the chocolate chips and mint leaves once the ice cream has reached soft-serve consistency. Continue to freeze until solid.
Triple Berry Almond Ice Cream
(Print Recipe)
3 cups unsweetened almond milk
1/2 cup sugar
1 tbsp lemon juice
2 tsp lemon zest
1/2 cup strawberries
1/4 cup raspberries
1/4 cup blueberries
Cut the strawberries into bite-sized chunks. Flash freeze all the berries by placing the chunks on a plate lined with parchment or waxed paper. Make sure they are mostly not touching; otherwise they will stick together, defeating the purpose of flash freezing. Keep in freezer for several hours. Once frozen, transfer to a sealable bag or container until you are ready to use.
Bring milk to boil. Stir in the sugar, lemon juice, and zest. Lower the heat and let it simmer for an hour and a half, stirring occasionally. Once mixture reduces to about 2/3 its original volume, and thickly coats the back of a spoon, remove from heat. Chill in the fridge overnight.
Once cool, freeze in an ice cream maker according to manufacturer's instructions. Add the berries once the ice cream has reached soft-serve consistency. Ripen in the freezer until solid.
If you don't have an ice cream maker, simply move the chilled mixture to a shallow container and freeze it, stirring every half hour for about 3 hours, until ice cream becomes difficult to stir. Pay careful attention to the edges, being sure to scrape and mix any frozen portions thoroughly with the rest. Add the berries once the ice cream has reached soft-serve consistency. Continue to freeze until solid.
The following recipes have been husband-tested and approved! His favorite is the Chunky Monkey. I can't choose a favorite. I like them all.
Almond Ice Cream Base
(Print Recipe)
3 cups homemade almond milk
1/3-1/2 cup sugar, depending on preference and the sweetness level of whatever goodies you want to add to it.
Bring milk to a boil. Stir in the sugar. Lower the heat as low as your stove will allow and let it simmer for at least an hour and a half. You may want to walk by occasionally and stir it, but patience is the key here! You want to reduce the milk to about 2/3 it's original volume. Once the milk thickly coats the back of a spoon, it's ready.
You are basically making sweetened condensed almond milk (good to know for other baking projects that call for sweetened condensed milk). Add whatever flavors you want and chill in the fridge overnight. My favorite flavors to add are cocoa powder, peanut butter powder, and almond extract.
Once cool, freeze in an ice cream maker according to manufacturer's instructions. Add any nuts, fruit, or chocolate pieces when the ice cream reaches soft-serve consistency.
Transfer to a plastic container and ripen in the freezer until solid.
If you don't have an ice cream maker, simply move the chilled mixture to a shallow container and freeze it, stirring every half hour for about 3 hours, until ice cream becomes difficult to stir. Pay careful attention to the edges, being sure to scrape and mix any frozen portions thoroughly with the rest. Add any nuts, fruit, or chocolate pieces when the ice cream reaches soft-serve consistency. Continue to freeze until solid.
Mexican Chocolate Almond Ice Cream
(Print Recipe)
1/2 cup sugar
1 stick cinnamon
2 tbsp cocoa powder
Dash of cayenne (optional)
Place milk and cinnamon stick in a saucepan.
Bring to boil. Stir in the sugar. Lower the heat and let it simmer for an hour and a half, stirring occasionally. Once mixture reduces to about 2/3 its original volume, and thickly coats the back of a spoon, remove from heat.
Remove the cinnamon stick. Whisk cocoa powder into the milk.
If you are feeling particularly adventurous, stir in a dash of cayenne. Chill in the fridge overnight.
Once cool, freeze in an ice cream maker according to manufacturer's instructions. Ripen in the freezer until solid.
If you don't have an ice cream maker, simply move the chilled mixture to a shallow container and freeze it, stirring every half hour for about 3 hours, until ice cream becomes difficult to stir. Pay careful attention to the edges, being sure to scrape and mix any frozen portions thoroughly with the rest. Continue to freeze until solid.
Optionally dust with ground cinnamon or nutmeg before serving.
Chunky Monkey Almond Ice Cream
(Print Recipe)
1/3 cup sugar
1 1/2 tsp vanilla
1 banana
1/2 cup chocolate chips
1/4 cup chopped walnuts
Cut the banana into bite-sized chunks. Flash freeze by placing the chunks on a plate lined with parchment or waxed paper. Make sure they are mostly not touching; otherwise they will stick together, defeating the purpose of flash freezing. Keep in freezer for several hours. Once frozen, transfer to a sealable bag or container until you are ready to use.
Bring milk to boil. Stir in the sugar and vanilla. Lower the heat and let it simmer for an hour and a half, stirring occasionally. Once mixture reduces to about 2/3 its original volume, and thickly coats the back of a spoon, remove from heat. Chill in the fridge overnight.
Once cool, freeze in an ice cream maker according to manufacturer's instructions. Add the banana, chocolate chips, and walnuts once the ice cream has reached soft-serve consistency. Ripen in the freezer until solid.
If you don't have an ice cream maker, simply move the chilled mixture to a shallow container and freeze it, stirring every half hour for about 3 hours, until ice cream becomes difficult to stir. Pay careful attention to the edges, being sure to scrape and mix any frozen portions thoroughly with the rest. Add the banana, chocolate chips, and walnuts once the ice cream has reached soft-serve consistency. Continue to freeze until solid.
Mint Chocolate Chip Almond Ice Cream
(Print Recipe)
3 cups unsweetened almond milk
1/2 cup sugar
2 tsp mint extract
1 tbsp chopped, fresh mint leaves
1 cup chocolate chips
Bring milk to boil. Stir in the sugar and mint. Lower the heat and let it simmer for an hour and a half, stirring occasionally. Once mixture reduces to about 2/3 its original volume, and thickly coats the back of a spoon, remove from heat. Chill in the fridge overnight.
Once cool, freeze in an ice cream maker according to manufacturer's instructions. Add the chocolate chips and mint leaves once the ice cream has reached soft-serve consistency. Ripen in the freezer until solid.
If you don't have an ice cream maker, simply move the chilled mixture to a shallow container and freeze it, stirring every half hour for about 3 hours, until ice cream becomes difficult to stir. Pay careful attention to the edges, being sure to scrape and mix any frozen portions thoroughly with the rest. Add the chocolate chips and mint leaves once the ice cream has reached soft-serve consistency. Continue to freeze until solid.
Triple Berry Almond Ice Cream
(Print Recipe)
3 cups unsweetened almond milk
1/2 cup sugar
1 tbsp lemon juice
2 tsp lemon zest
1/2 cup strawberries
1/4 cup raspberries
1/4 cup blueberries
Cut the strawberries into bite-sized chunks. Flash freeze all the berries by placing the chunks on a plate lined with parchment or waxed paper. Make sure they are mostly not touching; otherwise they will stick together, defeating the purpose of flash freezing. Keep in freezer for several hours. Once frozen, transfer to a sealable bag or container until you are ready to use.
Bring milk to boil. Stir in the sugar, lemon juice, and zest. Lower the heat and let it simmer for an hour and a half, stirring occasionally. Once mixture reduces to about 2/3 its original volume, and thickly coats the back of a spoon, remove from heat. Chill in the fridge overnight.
Once cool, freeze in an ice cream maker according to manufacturer's instructions. Add the berries once the ice cream has reached soft-serve consistency. Ripen in the freezer until solid.
If you don't have an ice cream maker, simply move the chilled mixture to a shallow container and freeze it, stirring every half hour for about 3 hours, until ice cream becomes difficult to stir. Pay careful attention to the edges, being sure to scrape and mix any frozen portions thoroughly with the rest. Add the berries once the ice cream has reached soft-serve consistency. Continue to freeze until solid.
Subscribe to:
Posts (Atom)