Monday, October 28, 2013

Video Game Character Jack-O'-Lanterns

It's pumpkin time! This weekend, we gathered all our old friends together for a pumpkin carving party. This is the third year running that we have hosted this ritual. We eat, we drink, we carve, we eat, we play games, we eat some more.

I just want to throw in a word about the Wii U here. Last Christmas, we decided to buy one, even though we never buy consoles or games right at release. We usually wait to see if we can get a good price on a used one. That said, the Wii U has been pretty awesome. Then again, they only had a couple of games worth playing for the longest time. Just in the past month or so, there has been an explosion of new games. So, almost a full year after we bought the console, we finally bought a new game: Rayman Legends! Up to five people can play at once, so it is perfect for big groups. With so much going on on screen, and everyone bumping into each other constantly, the irritation level is up there with Super Mario Bros Wii (or Super Frustration Bros, as my husband has nicknamed it). I'm sure our neighbors did not appreciate all the yelling and cursing at such a late hour. But we had tons of fun. As far as I am aware, all who played are still on friendly terms.

Now for the fun, holiday-related content! All the pumpkins were awesome. I have some really talented (or warped) friends.


I carved a couple of pumpkins with some classic video game characters (along the lines of the silhouettes I made in a previous post). I went ahead and made some patterns out of my favorites.


Feel free to use these patterns on your own pumpkins. Happy carving!
*Note: more patterns will be available soon, as soon as I get my scanner working properly!

Monday, October 21, 2013

Pumpkin Banana Bread

I have been baking like mad lately, so please excuse all the recipe posts. Fall is the best time for baking, even if it's sunny and 80 degrees outside. I can't help but share these tasty concoctions I've put together!

My mother always says there is no such thing as a bad banana. You might think otherwise when you see the bananas I bought last week and failed to eat:


With mother's words echoing in my brain, I just couldn't bring myself to dispose of these bananas. I've never been great at making banana bread, though; it always turns out dry and heavy. I do, however, have a great recipe for pumpkin bread. So, naturally, I decided to adapt that recipe to include my beautifully ripened bananas.


Pumpkin Banana Bread 
(Print Recipe)

2 medium, incredibly ripe bananas, mashed
1 15 oz. can pumpkin pureƩ
4 eggs
2 cups sugar
1 cup vegetable oil
1/2 cup water
4 cups flour
2 tsp baking soda
1 1/2 tsp salt
1 tsp cinnamon
1 tsp nutmeg
1/2 tsp cloves
1/2 tsp ginger
1 cup chopped walnuts or pecans (optional)

Start by greasing and flouring some loaf pans. This actually made a lot more than I anticipated, so I ended up making half a dozen jumbo muffins in addition to the 4 mini loaves I originally intended to make. I'd say you could probably choose from the following:
18 jumbo muffins
6 6"x3" loaves
3 9"x"5" loaves

Squish your bananas and pumpkin together in a large mixing bowl. Mix in the eggs one at a time. Add in the sugar, then the oil and water. In a separate bowl, stir together the flour, baking soda, salt, and spices. Add the dry ingredients to the pumpkin mixture, along with the nuts, and stir until just combined.


Spoon the batter into your prepared pans, filling them about 2/3 full. Bake at 350° F, 30-40 minutes for muffins, or 45-60 minutes for loaves. Test with a toothpick, and let them cool on wire racks when done.


This recipe turned out moist and full of that Fall flavor I've been craving. Since it made more than my husband and I could hope to eat ourselves, I went ahead and wrapped a few of these puppies up and sent them off to various family members.

Monday, October 14, 2013

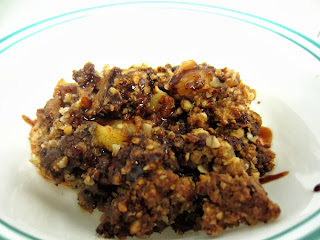
Chocolate Apple Crisp

Last month, my family went apple picking. It was hot and crowded, and the apples were expensive, but we had a lot of fun. Helping my sister's kids try to reach the apples was, of course, the highlight of the event. Naturally, everyone has been making delicious apple concoctions ever since.


After I got home with a bag full of apples, I found myself in a little dilemma. I wanted to use the apples we harvested to make dessert for my in-laws, but I also wanted to make something chocolatey. Anyone who knows me can tell you it's just not dessert if it doesn't include chocolate. So, I put a little spin on the traditional apple crisp.


Chocolate Apple Crisp
(Print Recipe)

Apple Filling:
5 cups apples, pealed and sliced (about 6 medium apples)
3 Tbsp raw sugar
1 Tbsp cocoa powder
1 tsp ground cinnamon

Crumble Topping:
1/2 cup cold butter
1 cup pecans
1 cup oats
1/4 cup chocolate chips
1 cup brown sugar
1/4 cup flour
1/2 tsp nutmeg
1/2 tsp cinnamon

Prepare your apples. Once they are pealed and sliced, soak them in a bowl of water. I recommend adding a teaspoon of citric acid to keep them from turning brown while you make your topping.


In a food processor, blend butter, pecans, oats, chocolate chips, brown sugar, flour, and spices until coarsely combined. Set aside. Don't overwork it, or the butter will soften too much to "crumble."


Drain the apples and place them in a 9"x13" pan. Add in the sugar, cocoa powder, and cinnamon, and toss to coat. Spread them evenly on the bottom of the pan, and top with the crumble.


Bake at 375° F for 30 minutes. Serve warm with a dollop of whipped cream or a drizzle of chocolate sauce over top.


I must add a disclaimer here; as hard as it is for me to say, this recipe may have too much chocolate for some. If you are one of those people that complains about not being able to taste the apple, try leaving out the chocolate chips. Maybe put the cocoa powder in the crumble instead. Either way, this combination is sure to be a winner.

Monday, October 7, 2013

DIY Silhouettes

When we did our Super Mario style haunted house for Halloween a couple years ago, I made some silhouettes of Princess Peach and Mario to hang on the walls. I've seen several versions of this idea floating around the internet, so here is my take on them.

We did Mario and Peach to fit the theme of our Halloween decor, but you can obviously do this with any silhouette. If you like these, feel free to use mine as a template to make your own. I will also soon have smaller versions available for purchase on my Etsy shop. :)
To make these, you'll need two sheets of vellum, two sheets of black acid-free paper, two picture frames, and an x-acto knife.

First, prepare your frames however you like. I painted mine silver, but crackle paint is also a nice touch.


Next, take the glass out of the frame and use it to trace the correct size onto the vellum. This step may be unnecessary if you are using a standard 8 1/2 x 11 frame, but it is extremely helpful for round or oval frames.

Once you know what size you have to work with, use a pencil to draw or trace your design onto the vellum. Hint: I had a design ready to go, but it was too small for the frame. So, I scanned it and used the image viewer on my computer to zoom in until it was the size I wanted. I then traced it directly from my computer screen onto the vellum.

Now, cut out your design with an x-acto knife. Try to make smooth cuts; vellum is not very forgiving. After you're done cutting it out, go ahead and erase any pencil marks that might be showing. Again, vellum is not forgiving, so be careful not to crease it. (You might notice a little white line under Mario's nose... I was not very careful with my eraser.)


Once again, take the glass from the frame and use it as a guide to cut both the vellum and the black paper.


You are almost ready to assemble them! Be sure to clean both sides of the glass, now that you've smeared finger prints all over it. Position the vellum cut-outs how you want them, keeping in mind which direction you want them to face. Next, place the black paper in the back.


If you have odd frames like the ones I chose, you may need to tape the paper down before putting the back on. On the original version that I made, I actually secured the vellum using spray-on glue. Word to the wise: vellum does not look good with spray-on glue. It gets strange bubbles and is not as opaque as it should be. Trust me, they stay fine with just the tape. Lastly, secure the back onto the frames, and they are ready to display in your haunted mansion!